


Saturday 8 May 2010
Strat style guitar reworked
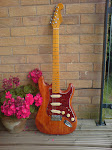
If you have followed my blog you will see how I built this strat style guitar from scratch. But after restoring an old bass guitar I was not happy with the finish of this one so I resprayed her beige and put on a new rosewood neck. I also put my own name on the headstock of this guitar. Hope you like the new look in this picture. :-)
Tuesday 9 March 2010
Change of heart
After doing other projects after this one I have decided To change this guitar once again. I am going to strip it, prime it and paint it a nice beige colour and give it a nice shiny clear coat. I feel this colour will suit the guitar well and blend with the tori plate and honey neck. I will keep you posted and include pictures and step by step guide.
Sunday 26 July 2009
Assembled Custom Guitar
Now I have assembled the electrics and grounded the trem claw and wired the output jack I ordered a new pickguard. I went for a 62 config 3 ply tortoise Shell. The picture I had in my mind all along was now depending on what it would look like with the new pickgaurd. When it arrived I transferred everything to it and I was not disappointed. It looked everything I hoped it would do and I was really excited and could not wait to string it up and do a setup. Here are two pictures of it and I must say I am really happy with the build. It turned out to be everything I wanted and it also plays and sounds very good. I was over the moon with the overall tone of this guitar. I went through a stage of not playing the guitar for a while but this whole experience as brought the spark back and I keep plugging it into my amp and find myself playing more than I ever did.


Pickups And Elecrics
Because I set out to build a 60s style guitar I decided that the pickups I bought online should be vintage style with staggered pole pieces and cream covers. I found a set of stat single coil pickups that was vintage wound and ceramic bar magnet. I also felt it was important that I used 250k pots for the tone and volume. I opted for Alpha pots to keep the cost down as I have used them before and never had a problem with them. You could use the more expensive CTS pots. Vintage Fender Stratocasters used .1uf capacitors for the tone in the 50s and 60s but for this project I used .022uf cap which are used in many modern stratocasters, And I feel have a great tone. I also made my own treble bleed using a .001cap and 100k resistor which is used on the two legs of the volume pot to help keep the guitar sounding bright and from loosing tone at low volume. It is also important to ground the trem claw.


Fitting Out Strat Style Body.
Now that the body was dry and ready to be assembled I decided I wanted to fit a vintage style 6 screw bridge with vintage style saddles. When I bought the vintage style saddles they was 11mm wide and they needed to be 10mm for the import tremolo bridge I was using from another guitar. Adamant to fit the vintage saddles I filed and polished both sides of the saddles and made them 10mm. I was very happy when they all fit in place when screwed to the bridge. I also used the output jack from a donor guitar. You can also see some screw holes for the scratch plate that I had for it but decided at this point that I was not going to use the white single ply
scratch plate on it. I also felt now maybe a good time to attach the maple honey lacquered neck I bought for £50. Although the neck looked very yellow against the body at this time I could see in my minds eye the finished guitar and was on a mission to build it.


scratch plate on it. I also felt now maybe a good time to attach the maple honey lacquered neck I bought for £50. Although the neck looked very yellow against the body at this time I could see in my minds eye the finished guitar and was on a mission to build it.


Finishing Strat Style Body
I very lightly sanded the basswood body until it was nice and smooth and also to remove any imperfections, grease or glue. I decided I was not going to paint it but opted to use wood dye which is not often used on basswood bodies but I felt if it did not work I could always sand and paint it. But by this time I had a picture in my head of how I wanted it. I bought tin of Spanish Mahogany wood dye and applied it with a lint free cloth in the direction of the grain and built up
around three coats.

When the body was dry and I was happy with the dye I decided to use polyurethane gloss varnish which would not only protect it but bring out the colour and give it a nice glossy shine. Even though polyurethane drys to the touch within hour or two it takes few days to cure and harden to a point you can begin to start screwing parts to your new body.


around three coats.


When the body was dry and I was happy with the dye I decided to use polyurethane gloss varnish which would not only protect it but bring out the colour and give it a nice glossy shine. Even though polyurethane drys to the touch within hour or two it takes few days to cure and harden to a point you can begin to start screwing parts to your new body.


Stratocaster Style Body
Looking for a Stratocaster style body can be a hard choice and also a very expensive one. Body wood on a Stratocaster is normally alder, ash, basswood or laminated woods. Because I am on a very limited budget I can not afford to spend a fortune and want to build a nice sounding guitar cheaply as possible. After much searching on the Internet I found a basswood Strat style body on eBay which I managed to buy for £21. It was unfinished bare wood so gave me lot of scope as to what colour or custom finish I would like on my Strat style guitar. Also even fender make some of their reissue Stratocasters from basswood although its not everybody's idea of a good body wood. I figured that because I would be using a all maple neck on my strat style guitar which is bright sounding anyway that basswood would be ok for this project. I was happy when the body arrived as it was in very good shape and did not need much sanding and did not have green coloured grain like some basswood bodies have.

Subscribe to:
Posts (Atom)